
SINGLE-SPEED ASSEMBLY GUIDE
Congratulations on your purchase of your brand new Lochside bicycle! Please read carefully for step-by-step instructions on how to properly assemble your new ride.
- 5-Speed Bicycle Assembly Guide: Download PDF
- Single-speed Bicycle Assembly Guide: Download PDF
- Front Rack Insallation Guide: Download PDF

Tools Required
- Wrench 15mm
- Wrench 10mm
- Allen key 4mm
- Allen key 5mm
- Allen key 6mm
- Scissors
- Tire pump (with presta valve)
- Bicycle grease recommended*
- Grab a beverage and some good tunes

Unpacking & Setup
Keep the box upright and lift the bike out carefully.
Using the cardboard on the floor for protection, place the bike flat on the cardboard with the chainring face up.
- Use scissors to cut and remove all zip ties and packaging from the bicycle.
- Remove the front wheel by gently sliding it free from the crankarm and set aside. You may need to rotate the crankarm to easily release the front wheel.
- Unpack the small brown box which contains the pedals, saddle, seat post and reflectors.
- Place the bike upright and turn the front fork so the front brake is facing forwards.

FRONT WHEEL
- Remove the black protector that is inserted into the bottom of the fork.
- Grab the front wheel and loosen the bolts on either side, to about 90%.
- Determine proper direction of the front wheel as indicated on the side of the tire.
- Place the drops outs of the front fork onto the wheel
- Attach the washers hooks into the their corresponding eyelets on either side of the front fork.
- Make sure the wheel is centred to the fork.
- Fully tighten both bolts equally with the 15mm wrench.
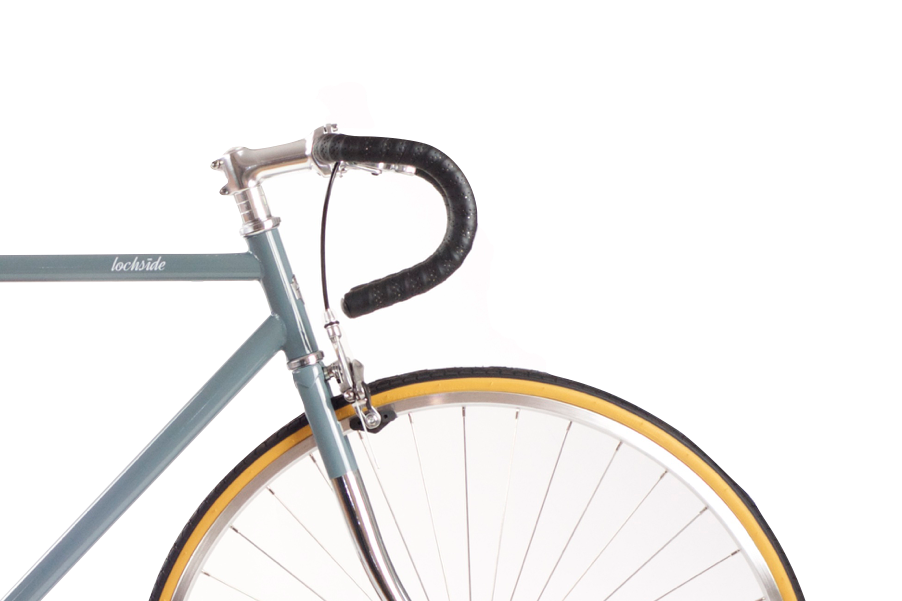
Stem & Handlebars
- Ensure the brake and shifter cables are untangled and in front of the head tube.
- Align the handlebars and stem inline with the fork.
- Tighten the pinch bolts onto the stem, using the 5mm allen key.
- Place hands in the drops and rotate the bars so they feel comfortable and natural.
- Using the 4mm allen key, equaly tighten the handlebar clamp bolts. (The lowest part of the bars should be parallel to the ground, or pointing slightly downwards).

Pedals
- Remove pedals from their packaging. Each pedal is marker “L” for left, and “R” for right on the end of each bolt.
- Insert the RIGHT pedal into the right side of the bike, the side with the chain. Slowly thread by hand turning the right pedal CLOCKWISE. NOTE: If the pedal does not easily tighten by hand, re-check positioning of the pedal and try again.
- Insert the LEFT pedal on the left side of the bike. Rotate the LEFT pedal COUNTERCLOCKWISE and tighten it by hand.
- Use the 15mm wrench to fully tighten both sides.

Saddle & Seatpost
- Remove the saddle and seat post from the small brown box.
- Loosen off the seatpost bolt most of the way and rotate the seat clamp 90 degrees, this will make it easier to attach to the saddle.
- Attach to seatpost to the seat rail of the saddle. Make sure the bolt of the seat is facing to the back.
- Rotate the seat clamp back 90 degrees into the desired position.
- Your seat should be horizontal with a slight upward lift for optimal comfort.
- Securely tighten the seatpost bolt with the 6mm allen key.
- Next, insert the seatpost into the seat tube.
- Set the saddle to proper height and secure the seatpost clamp using the 5mm allen key. NOTE: Make sure the seatpost insertion indicator line is not visible.

BRAKES
- Align the brake pads to the flat machined breaking surface of the rim.
- Ensure your brakes quick-release mechanism is in the down position.
- Tighten break by turning the adjustment knob.
- Test breaks and tighten cable further if needed.
- NOTE: You may need to undo the cable fastener, pull the cable tight and then fasten again using the 5mm allen key.

Safety Check
Adjust handlebars and seat to your specific riding needs. Ensure you have tightened everything very securely and make sure tires are properly inflated to the correct pressure before riding.
Although our bikes are easy to assemble we recommend all bikes purchased be assembled by a certified bike shop mechanic. NOTE: Cranks, pedals, threads etc. that are stripped due to parts not being tightened properly by the rider are void of warranty.
Happy riding!
We would love to keep up with our Lochside riders, tag @lochsidecycles or #lochsidecycles so we can see your bike in action.
If you have any assembly questions please email us at info@lochsidecycles.com or swing by your local bike shop.